All commands, alphabetic order; letter Q
\qbezier
\qbezier command takes three arguments which are points (it is
valid only inside a picture environment, and a point is given by a
list of two real numbers, separated by a comma, with parentheses
around). The result is a quadratic Bezier curve that goes from the
first to the last point, and the second point is a control point. The
XML translation is a <bezier> element, an empty element that has
the coordinates of the points (multiplied by the unitlength) as
attributes.\setlength\unitlength{10pt}
\begin{picture}(12,10)(-2,0)
%\linethickness{0.4pt}
\qbezier(2,6)(7,6)(9,3)
\qbezier(2,0)(7,0)(9,3)
\qbezier(2,6)(4,3)(2,0)
\qbezier(1,6)(3,3)(1,0)
\put(9.75,3.00){\circle{1.50}}
\put(10.5,3.00){\line(1,0){1.50}}
\put(0,5){\line(1,0){1.5}}
\put(0,1){\line(1,0){1.50}}
\end{picture}
<picture xpos='-20' ypos='0' width='120' height='100'>
<bezier a1='20' a2='60' b1='70' b2='60' c1='90' c2='30'/>
<bezier a1='20' a2='0' b1='70' b2='0' c1='90' c2='30'/>
<bezier a1='20' a2='60' b1='40' b2='30' c1='20' c2='0'/>
<bezier a1='10' a2='60' b1='30' b2='30' c1='10' c2='0'/>
<put xpos='97.5' ypos='30'><circle size='15'/></put>
<put xpos='105' ypos='30'><line xdir='1' ydir='0' width='15'/></put>
<put xpos='0' ypos='50'><line xdir='1' ydir='0' width='15'/></put>
<put xpos='0' ypos='10'><line xdir='1' ydir='0' width='15'/></put>
</picture>
Preview 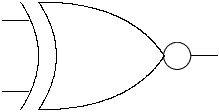
The command takes also an optional argument, that is the number of points. Here is the second example
\setlength\unitlength{1pt}
\begin{picture}(120,100)(-5,0)
%\linethickness{.5pt}
 \qbezier [50](0,0)(0,100)(100,0)
 \qbezier     (0,0)(30,80)(100,0)
 \qbezier[150](0,0)(60,60)(100,0)
 \qbezier[200](0,0)(90,40)(100,0)
 \qbezier     (0,0)(120,20)(100,0)
% mark the end points
 \put(0,0){\circle*{3}}
 \put(100,0){\circle*{3}}
% mark the control points
 \multiput(0,100)(30,-20){5}{\circle{2}}
\end{picture}
and the translation
<picture xpos='-5' ypos='0' width='120' height='100'>
<bezier a1='0' a2='0' b1='0' b2='100' c1='100' c2='0' repeat='50'/>
<bezier a1='0' a2='0' b1='30' b2='80' c1='100' c2='0'/>
<bezier a1='0' a2='0' b1='60' b2='60' c1='100' c2='0' repeat='150'/>
<bezier a1='0' a2='0' b1='90' b2='40' c1='100' c2='0' repeat='200'/>
<bezier a1='0' a2='0' b1='120' b2='20' c1='100' c2='0'/>
<put xpos='0' ypos='0'><circle full='true' size='3'/></put>
<put xpos='100' ypos='0'><circle full='true' size='3'/></put>
<multiput xpos='0' ypos='100' repeat='5' dx='30' dy='-20'><circle size='2'/></multiput>
</picture>
Preview 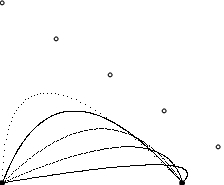
Yet another picture. This is from the book of Lamport, page 220. The
only difference is that we used \multiput*. Without the star, the
argument is evaluated once, but in this case, the counter has to be
incremented by Tralics.
\newcounter{cms}
\setlength{\unitlength}{1mm}
\begin{picture}(50,39)
\put(0,7){\makebox(0,0)[bl]{cm}}
\multiput*(10,7)(10,0){5}{\addtocounter{cms}{1}\makebox(0,0)[b]{\arabic{cms}}}
\put(15,20){\circle{6}}
\put(30,20){\circle{6}}
\put(15,20){\circle*{2}}
\put(30,20){\circle*{2}}
\put(10,24){\framebox(25,8){car}}
\put(10,32){\vector(-2,1){10}}
\multiput(1,0)(1,0){49}{\line(0,1){2.5}}
\multiput(5,0)(10,0){5}{\line(0,1){3.5}}
\thicklines
\put(0,0){\line(1,0){50}}
\multiput(0,0)(10,0){6}{\line(0,1){5}}
\end{picture}
<picture width='142.26303' height='110.96516'>
<pic-put xpos='0' ypos='19.91682'>
       <pic-framebox width='0' height='0' position='bl'>cm</pic-framebox></pic-put>
<pic-put xpos='28.4526' ypos='19.91682'>
       <pic-framebox width='0' height='0' position='b'>1</pic-framebox></pic-put>
<pic-put xpos='56.90521' ypos='19.91682'>
       <pic-framebox width='0' height='0' position='b'>2</pic-framebox></pic-put>
<pic-put xpos='85.35782' ypos='19.91682'>
       <pic-framebox width='0' height='0' position='b'>3</pic-framebox></pic-put>
<pic-put xpos='113.81042' ypos='19.91682'>
       <pic-framebox width='0' height='0' position='b'>4</pic-framebox></pic-put>
<pic-put xpos='142.26303' ypos='19.91682'>
       <pic-framebox width='0' height='0' position='b'>5</pic-framebox></pic-put>

<pic-put xpos='42.67891' ypos='56.90521'><pic-circle size='17.07156'/></pic-put>
<pic-put xpos='85.35782' ypos='56.90521'><pic-circle size='17.07156'/></pic-put>
<pic-put xpos='42.67891' ypos='56.90521'><pic-circle full='true' size='5.69052'/></pic-put>
<pic-put xpos='85.35782' ypos='56.90521'><pic-circle full='true' size='5.69052'/></pic-put>
<pic-put xpos='28.4526' ypos='68.28625'>
       <pic-framebox width='71.13152' height='22.76208' framed='true'>car</pic-framebox></pic-put>
<pic-put xpos='28.4526' ypos='91.04834'><pic-vector xdir='-2' ydir='1' width='28.4526'/></pic-put>
<pic-multiput xpos='2.84526' ypos='0' repeat='49' dx='2.84526' dy='0'>
      <pic-line xdir='0' ydir='1' width='7.11314'/></pic-multiput>
<pic-multiput xpos='14.2263' ypos='0' repeat='5' dx='28.4526' dy='0'>
      <pic-line xdir='0' ydir='1' width='9.9584'/></pic-multiput>
<pic-thicklines/><pic-put xpos='0' ypos='0'><pic-line xdir='1' ydir='0' width='142.26303'/></pic-put>
<pic-multiput xpos='0' ypos='0' repeat='6' dx='28.4526' dy='0'>
      <pic-line xdir='0' ydir='1' width='14.2263'/></pic-multiput>
</picture>
Preview 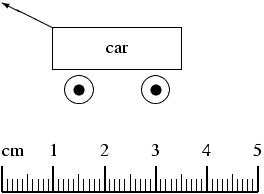
Another example.
\setlength\unitlength{1.5pt}
\begin{picture}(220,30)(0,0)
\put(0,0){\makebox(30,10){aaa}}
\put(40,0){\framebox(30,10)[lb]{bbb}}
\put(80,0){\dashbox{1}(30,10)[bl]{ccc}}
\put(120,0){\dashbox{2}(30,10)[rt]{ddd}}
\put(160,0){\dashbox{5}(30,10)[b]{eee}}
\put(192,1){\frame{W}}
\put(15,20){\oval(30,10)}
\put(55,20){\oval(30,10)[t]}
\put(95,20){\oval(30,10)}
\put(135,20){\oval(30,10)[bl]}
\put(175,20){\oval(30,10)[r]}
\end{picture}
Translation
<picture xpos='0' ypos='0' width='330' height='45'>
<pic-put xpos='0' ypos='0'>
    <pic-framebox width='45' height='15'>aaa</pic-framebox></pic-put>
<pic-put xpos='60' ypos='0'>
    <pic-framebox width='45' height='15' position='lb' framed='true'>bbb</pic-framebox></pic-put>
<pic-put xpos='120' ypos='0'>
    <pic-dashbox dashdim='1.5' width='45' height='15' position='bl'>ccc</pic-dashbox></pic-put>
<pic-put xpos='180' ypos='0'>
    <pic-dashbox dashdim='3' width='45' height='15' position='rt'>ddd</pic-dashbox></pic-put>
<pic-put xpos='240' ypos='0'>
    <pic-dashbox dashdim='7.5' width='45' height='15' position='b'>eee</pic-dashbox></pic-put>
<pic-put xpos='288' ypos='1.5'><pic-frame>W</pic-frame></pic-put>
<pic-put xpos='22.5' ypos='30'><pic-oval xpos='45' ypos='15'/></pic-put>
<pic-put xpos='82.5' ypos='30'><pic-oval xpos='45' ypos='15' specs='t'/></pic-put>
<pic-put xpos='142.5' ypos='30'><pic-oval xpos='45' ypos='15' /></pic-put>
<pic-put xpos='202.5' ypos='30'><pic-oval xpos='45' ypos='15' specs='bl'/></pic-put>
<pic-put xpos='262.5' ypos='30'><pic-oval xpos='45' ypos='15' specs='r'/></pic-put>
</picture>
Preview 
\qopname
The \qopname command takes three arguments, A, B, C. If the second
argument is o, translation is the same as \operatorname{C} otherwise
it is the same as \operatornamewithlimits{C}. This is an operator
named C; depending on B, it has limits, or has no limits. The first
argument is ignored. Example
\[
\qopname {}o{foo}_x \qopname {}{l}{foo}_x
\operatorname{bar}_x \operatorname*{bar}_x
\operatornamewithlimits{gee}_x\]
Translation
<formula type='display'>
  <math mode='display' xmlns='http://www.w3.org/1998/Math/MathML'>
   <mrow>
     <msub><mo form='prefix'>foo</mo> <mi>x</mi> </msub>
     <munder><mo form='prefix'>foo</mo> <mi>x</mi> </munder>
     <msub><mo form='prefix'>bar</mo> <mi>x</mi> </msub>
     <munder><mo form='prefix'>bar</mo> <mi>x</mi> </munder>
     <munder><mo form='prefix'>gee</mo> <mi>x</mi> </munder>
   </mrow>
  </math>
</formula>
\qprime (math symbol)
The \qprime command is valid only in math mode. It generates a
quadruple prime symbol: <mi>⁗</mi> (Unicode U+2057, ⁗).
\qquad
The \qquad command is valid in math mode and text mode. In math
mode, it generates a space of width two em, <mspace width='2.em'/>.
Outside math mode, it generates or   .
Here are some commands valid in math and non-math mode.
\def\cmd{a\dots b\ldots c\quad d\qquad e\space f\$g\%h\&i\!j\,k\{%
l\}m\i n\sharp o\natural p\flat q\_}
\cmd\\ $\cmd$
This is the XML translation.
<p>
a...b...c d e f$g%h&ij k{l}mın♯o♮p♭q_</p>
<p noindent='true'><formula type='inline'>
<math xmlns='http://www.w3.org/1998/Math/MathML'><mrow><mi>a</mi>
<mo>⋯</mo><mi>b</mi><mo>...</mo><mi>c</mi><mspace width='1.em'/>
<mi>d</mi><mspace width='2.em'/><mi>e</mi><mi>f</mi><mi>$</mi><mi>g</mi>
<mo>%</mo><mi>h</mi><mo>&</mo><mi>i</mi><mspace width='-0.166667em'/>
<mi>j</mi><mspace width='0.166667em'/><mi>k</mi><mo>{</mo><mi>l</mi><mo>}</mo>
<mi>m</mi><mo>ı</mo><mi>n</mi><mo>♯</mo><mi>o</mi><mo>♮</mo>
<mi>p</mi><mo>♭</mo><mi>q</mi><mo>_</mo></mrow></math></formula>
</p>
\quad is really different
in math mode and outside it.
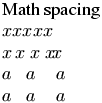
We show here the values of thin-space, med-space and thick-space
(\,, \>, \;) as well as neg-thin-space (\!). The TeX
values are 3, 4 and 5 mu respectively, where a mu is 1/18 em.
The value used by Tralics is the 6-digit approximation given in the
MathML Recommendation.
Math spacing\\
$xxxxx$\\
$x\,x\>x\;x\!x$\\
$a\,\,\,\,\,a\>\>\>\>\>a$\\
$a\;\;\;a\;\;\;\;a$\\
 (see also here).
\quad
\quad command is valid in math mode and text mode. In math
mode, it generates a space of width one em,
<mspace width='1.em'/>. Outside math mode, it generates
or   See description of the
`\qquad <doc-q.html#cmd-qquad>`__
command.quotation (environment)
\begin{quotation}text\end{quotation} then your text
will be in quotation mode. For more information, see description of the command
`\centering <doc-c.html#cmd-centering>`__.quote (environment)
\begin{quote}text\end{quote} then your text will be
in quote mode. For more information, see description of the command
`\centering <doc-c.html#cmd-centering>`__. By default, there is no
difference between quote and quotation.