All commands, alphabetic order; letter A
\a
The \a command can be used to put accents in a tabbing
environment. This environment is not implemented in Tralics. If you
say \a', it is the same as if you had said \'. The following
shows some errors provoked by the misuses of this command.
>  \a{}e
Error signaled at line 1:
wanted a single token as argument to \a.
>  \a{foo}
Error signaled at line 2:
wanted a single token as argument to \a.
>  \a\foo
Error signaled at line 3:
Bad syntax of \a, argument not a character \foo.
>  \a+
Error signaled at line 4:
Bad syntax of \a, argument is {Character + of catcode 12}.
\aa (constant)
The \aa command translates into å or å. It is valid in math
mode also. See the latin supplement
characters.
\AA (constant)
The \AA command translates into Å or Å. This character is
valid in math mode also. See the latin supplement
characters.
\abarnodeconnect
The command \abarnodeconnect[d]{F}{T} connects nodes F and T using a
bar with an arrow, with depth d.
A tree is defined by some nodes and connectors. Each node has a name,
whose scope is limited to the current page (Tralics does no validity
test for the names). A connector can be attached to the top, bottom,
left or right of a node (abbreviation is one character of tblr), or
a corner (two letter, one of tb followed by one of lr). In some
cases a dimension is needed (this is a sequence of characters that can
be interpreted as a dimension by the XML post-processor). All commands
for the pst-tree package produce an element that has the same name as
the command (\nodepoint is an exception). Elements associated to
connectors are empty. See the pst-tree documentation for the meaning of
all the parameters, that are not tested by Tralics.
\node{a}{Value of node A}
\nodepoint{b} \nodepoint{c}[3pt]\nodepoint{d}[4pt][5pt]
\nodeconnect{a}{b}
\nodeconnect[tl]{a}[r]{c}
\anodeconnect{a}{b}
\anodeconnect[tl]{a}[r]{c}
\barnodeconnect[3pt]{a}{d}
\nodecurve{a}{b}{2pt} ?
\nodecurve[l]{a}[r]{b}{2pt}[3pt]
\nodetriangle{a}{b}
\nodebox{a}
\nodeoval{a}
\nodecircle[3pt]{a}
<node name='a'>Value of node A</node>
<node name='b'/>
<node xpos='3pt' name='c'/><node ypos='5pt' xpos='4pt' name='d'/>
<nodeconnect nameA='a' nameB='b' posA='b' posB='t'/>
<nodeconnect nameA='a' nameB='c' posA='tl' posB='r'/>
<anodeconnect nameA='a' nameB='b' posA='b' posB='t'/>
<anodeconnect nameA='a' nameB='c' posA='tl' posB='r'/>
<barnodeconnect nameA='a' nameB='d' depth='3pt'/>
<nodecurve nameA='a' nameB='b' posA='b' posB='t' depthB='2pt' depthA='2pt'/>?
<nodecurve nameA='a' nameB='b' posA='l' posB='r' depthB='3pt' depthA='2pt'/>
<nodetriangle nameB='b' nameA='a'/>
<nodebox nameA='a'/>
<nodeoval nameA='a'/>
<nodecircle nameA='a' depth='3pt'/>
\above
The \above command is a TeX primitive that should not be used.
Instead of aa \above1pt bb you should use
\genfrac{}{}{1pt}{}{aa}{bb}. Note that the dimension is an argument
in the case of \genfrac, while Tralics uses an ad-hoc strategy to
find it in the other case (two characters are read after digits or
decimal point). In particular \dimen0 is valid in the case of
\genfrac but not in the case of \above. See
`\genfrac <doc-g.html#cmd-genfrac>`__ and
`\over <doc-o.html#cmd-over>`__.
\abovedisplayshortskip (rubber length)
You can say \abovedisplayshortskip=10pt plus 2pt minus 3pt. The
\abovedisplayshortskip register contains a skip value that TeX puts
before a short display. The value is unused by Tralics. (See
scanglue for details of argument
scanning). (See `\predisplaysize <doc-p.html#cmd-predisplaysize>`__
for further details).
\abovedisplayskip (rubber length)
You can say \abovedisplayskip=10pt plus 2pt minus 3pt. The
\abovedisplayskip register contains a skip value that TeX puts
before a display. The value is unused by Tralics. (See
scanglue for details of argument
scanning). (See `\predisplaysize <doc-p.html#cmd-predisplaysize>`__
for further details).
\abovewithdelims
The \abovewithdelims command is a TeX primitive that should not be
used. Instead of aa \abovewithdelims()1pt bb you should use
\genfrac(){1pt}{}{aa}{bb}. See
`\genfrac <doc-g.html#cmd-genfrac>`__ and
`\over <doc-o.html#cmd-over>`__. See \above above.
abstract (Tralics environment)
The abstract environment is defined as
\newenvironment{abstract}{}{} in versions up to 2.3 for
compatibility reasons. It is now a user-defined environment for the
Raweb only. It is undefined otherwise.
\accent
This command is unimplemented; see here for details.
accent (concept)
There are different ways to put an accent over a letter. You can say
\accent, but this is a TeX primitive not implemented in Tralics.
You can say
$\hat{a} \acute{a} \bar{a} \dot{a} \breve{a} \check{a} \grave{a} \vec{a} \ddot{a} \tilde{a}$,
but these commands work only in math mode, they produce characters like
this image 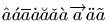 (for the MathML variant, see
here).
You can say éîÀ, but this works only if the character exists in the
current input encoding.
You can say \`e 'e ^e "e ~a .e =e (this gives
 ), or
\c c, \H o, \C o, \"o, \k a, \b b, \d a, \u a, \f a, \v a, \T e, \r a, \D a, \h a, \V e.
(this gives  ).
\k is not in Lamport, but is defined in
t1enc.def. The same is true for \r. The \f and \C commands
are defined by the t2aenc.def file. The \T command (tilde below),
\V (circonflex below), \D (circle below), \h (hook) are
defined only by Tralics. The \t command is not yet implemented.
Not all combinations exist, see each individual command for what letters
are accepted.
Double accents: in general, you can only put an accent over a letter. In
some cases you can put an accent over an accented character. Here are
some examples:
\={.a} ={"a}, "{'u} "{`u} "{v u} c{'c} c{u e} d{. s} '{^e}.
This gives 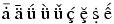 .
Strange accents. If you say \=\ae \'\ae \'\aa \'\o \'\i, then you
will see  . The first element in the list can also be
entered as
^^^^01e2, because it corresponds to Unicode character
U+1E2. Note that this character is as valid as, say, a comma, hence can
be used in math mode. Translation is <mi>Ǣ</mi>, as is the
case for all non-ascii characters.
Since version 2.12, Tralics accepts to put an accent on any (7bit
ASCII) letter. For instance, \D e produces the following two
characters: e̥ that should render as e̥. In the following
example, all characters but the last in the list translate into a single
Unicode character, the last one uses a combination.
\def\acclist#1#2{\def\theacc{#1}\let\next\oneacc\next#2\relax}
\def\Relax{\relax}
\def\oneacc#1{%
\ifx#1\relax\let\next\relax\else\theacc#1 \fi
\next}

\acclist\`{AEIOUNWYaeiounwyx}\par
\acclist\'{AEIOUYCLNRSZGKMPW\AE\AA\O\ae\aa\o aeiouyclnrszgkmpwv}\par
\acclist\^{AEIOUCGHJSWYZaeioucghjswyz}\par
\acclist\~{ANOUIVEYioanoioveyw}\par
\acclist\"{AEIOUYHWXaeiouyhwxtz}\par
\acclist\H{OUoue}\par
\acclist\r{AUauwye}\par
\acclist\v{CDELNRSTZAIUGKHcdelnrstzaiugkhjx}\par
\acclist\u{AEGIOUaegioux}\par
\acclist\={AEHIOTUYG\AE\ae aehiotuyg}\par
\acclist\.{ABCDEFGHILMNOPRSTWXYZabcdeghlmnoprstuvwzyzq}\par
\acclist\c{CGKLNRSTEDHcgklnrstedhb}\par
\acclist\k{AEIOUaeioub}\par
\acclist\D{AEIOURaeioury}\par
\acclist\b{BDKLNRTZbdklnrtzhe}\par
\acclist\d{BDHKLMNRSTVWZAEIOUYbdhklmnrstvwzaeiouyc}\par
\acclist\f{AEIOURaeiourx}\par
\acclist\T{EIUeiuo}\par
\acclist\V{DELNTUdelntua}\par
\acclist\D{Aae}\par
\acclist\h{AEIOUYaeiouyx}
À È Ì Ò Ù Ǹ Ẁ Ỳ à è ì ò ù ǹ ẁ ỳ x̀ Á É Í Ó Ú Ý Ć Ĺ Ń Ŕ Ś Ź Ǵ Ḱ Ḿ Ṕ Ẃ Ǽ Ǻ Ǿ ǽ ǻ ǿ á é í ó ú ý ć ĺ ń ŕ ś ź ǵ ḱ ḿ ṕ ẃ v́ Â Ê Î Ô Û Ĉ Ĝ Ĥ Ĵ Ŝ Ŵ Ŷ Ẑ â ê î ô û ĉ ĝ ĥ ĵ ŝ ŵ ŷ ẑ Ã Ñ Õ Ũ Ĩ Ṽ Ẽ Ỹ ĩ õ ã ñ õ ĩ õ ṽ ẽ ỹ w̃ Ä Ë Ï Ö Ü Ÿ Ḧ Ẅ Ẍ ä ë ï ö ü ÿ ḧ ẅ ẍ ẗ z̎ Ő Ű ő ű e̋ Å Ů å ů ẘ ẙ e̊ Č Ď Ě Ľ Ň Ř Š Ť Ž Ǎ Ǐ Ǔ Ǧ Ǩ Ȟ č ď ě ľ ň ř š ť ž ǎ ǐ ǔ ǧ ǩ ȟ ǰ x̌ Ă Ĕ Ğ Ĭ Ŏ Ŭ ă ĕ ğ ĭ ŏ ŭ x̆ Ā Ē Ħ Ī Ō Ŧ Ū Ȳ Ḡ Ǣ ǣ ā ē ħ ī ō ŧ ū ȳ ḡ Ȧ Ḃ Ċ Ḋ Ė Ḟ Ġ Ḣ İ Ŀ Ṁ Ṅ Ȯ Ṗ Ṙ Ṡ Ṫ Ẇ Ẋ Ẏ Ż ȧ ḃ ċ ḋ ė ġ ḣ ŀ ṁ ṅ ȯ ṗ ṙ ṡ ṫ u̇ v̇ ẇ ż ẏ ż q̇ Ç Ģ Ķ Ļ Ņ Ŗ Ş Ţ Ȩ Ḑ Ḩ ç ģ ķ ļ ņ ŗ ş ţ ȩ ḑ ḩ b̧ Ą Ę Į Ǫ Ų ą ę į ǫ ų b̨ Ḁ E̥ I̥ O̥ U̥ R̥ ḁ e̥ i̥ o̥ u̥ r̥ y̥ Ḇ Ḏ Ḵ Ḻ Ṉ Ṟ Ṯ Ẕ ḇ ḏ ḵ ḻ ṉ ṟ ṯ ẕ ẖ e̠ Ḅ Ḍ Ḥ Ḳ Ḷ Ṃ Ṇ Ṛ Ṣ Ṭ Ṿ Ẉ Ẓ Ạ Ẹ Ị Ọ Ụ Ỵ ḅ ḍ ḥ ḳ ḷ ṃ ṇ ṛ ṣ ṭ ṿ ẉ ẓ ạ ẹ ị ọ ụ ỵ c̣ Ȃ Ȇ Ȋ Ȏ Ȗ Ȓ ȃ ȇ ȋ ȏ ȗ ȓ x̑ Ḛ Ḭ Ṵ ḛ ḭ ṵ o̰ Ḓ Ḙ Ḽ Ṋ Ṱ Ṷ ḓ ḙ ḽ ṋ ṱ ṷ a̭ Ḁ ḁ e̥ Ả Ẻ Ỉ Ỏ Ủ Ỷ ả ẻ ỉ ỏ ủ ỷ x̉
The tipa/tipx package defines some double accents. Commands like
\textacutemacron produce a macron and an acute accent over the
letter. Since version 2.12, you can use \'=e as a short-hand. Note
that \'{\=e} produces character U+1E17 and \'{\=e} gives an
error. You can put an acute accent over any character via the construct
\=e^^^^0301. The Unicode standard says that this should be the same
as e^^^^0304^^^^0301, but this looks ugly in some cases; for this
reason, an under caron is used. You get a̖ a̖ ạ̀ ạ̀ à̱ à e̗ e̗ é̱ é̱ é o̭ o̭ ộ ộ ô
ṵ ṵ ụ͂ ụ͂ ũ a̤ a̤ ä ę ę e̋ o̥ u̥ o̱̊ o̱̊ o̊ u̬ u̬ ú̬ á̬ ǔ a̯ a̯ ă̠ ă̠ ă e̱ e̱ ē ọ ẹ ọ́ ọ́ a̐ u̇
‿au a͡e g͡b via the following input:
\`*a \textsubgrave{a} \`.a \textgravedot{a} \textgravemacron{a} \`a
\'*e \textsubacute{e} \'=e \textacutemacron{e} \'e
\^*o \textsubcircum{o} \^.o \textcircumdot{o} \^o
\~*u \textsubtilde{u} \~.u \texttildedot{u} \~u
\"*a \textsubumlaut{a} \"a
\H*e \textdoublegrave{e} \H e
\r*o \textsubring{u} \r=o \textringmacron{o} \r o
\v*u \textsubwedge{u} \v'u \textacutewedge{a} \v u
\u*a \textsubarch{a}  \u=a \textbrevemacron{a} \u a
\=*e \textsubbar{e} \=e
\.*o \textsubdot{e} \.'o \textdotacute{o} \textdotbreve{a} \.u
\t*au \t ae \texttoptiebar gb
The tipa package provides some additional accents; they are obtained via
a construction of the form \|m{t}. This needs redefinition of the
\| command (that produces a double vertical bar in math mode). This
redefinition is not done if the package is loaded in safe mode. You can
redefine the command as shown below; you can also use the long name,
here \textseagull. The symbols t̪ t̪ d̺ d̺ o̹ o̹ o̜ o̜ g̑ g̑ ɔ̟ o̟ e̞ e̞ ɛ̝ e̝ u̘ u̘ ə̙
e̙ e̽ e̽ k̫ k̫ t̼ t̼ are produced by the following input:
{\makeatletter \global\let\|\@omniaccent}
\textsubbridge{t} \|[t      \textinvsubbridge{d} \|]d
\textsubrhalfring{o} \|)o   \textsublhalfring{o} \|(o
\textroundcap{g} \|c{g}     \textsubplus{\textopeno} \|+o
\textlowering{e} \|`e       \textraising{\textepsilon} \|'e
\textadvancing{u} \|<u      \textretracting{\textschwa} \|>e
\textovercross{e} \|x{e}    \textsubw{k} \|w{k}
\textseagull{t} \|m{t}
The tipa package provides \super as an abbreviation for
\textsuperscript. A superscript H can also be given directly using
Unicode character U+02B0. Here are some examples, using both
alternatives ph = pʰ kw=kʷ tj=tʲ
dɣ=dˠ dʕ=dˁ dn dl=dˡ, and this
is the source.
p\super h = p^^^^02b0
k\super w=k^^^^02b7 t\super j=t^^^^02b2  d\super\textgamma=d^^^^02e0
d\super{\textrevglotstop}=d^^^^02c1
d\super n d\super l=d^^^^02e1
The next example uses the tipa package
\textpolhook{e} \textrevpolhook{o} \textvbaraccent{a}
\textdoublevbaraccent{a} \textsubsquare{n}
\textsyllabic{m} \textsuperimposetilde{t} t\textcorner{} t\textopencorner{}
\textschwa\textrhoticity{} b\textceltpal{} k\textlptr{} k\textrptr{}

\spreadlips{s} \overbridge{v} \bibridge{n} \subdoublebar{t}
\subdoublevert{f} \subcorner{v} \whistle{s} \sliding\texttheta s
\crtilde{m}  \doubletilde{s} \sublptr{J} \subrptr{J}

\textglotstop, \textglotstopvari, \textglotstopvarii, \textglotstopvariii,
\textraiseglotstop, \textbarglotstop, \textinvglotstop,
 \textcrinvglotstop, \textctinvglotstop,
\textturnglotstop, \textrevglotstop, \textbarrevglotstop

\textpipe, \textpipevar, \textdoublebarpipe, \textdoublebarpipevar,
\textdoublebarslash, \textdoublepipevar

x\textprimstress y x\textsecstress y
x\textlengthmark y x\texthalflength y
x\textbottomtiebar y  x\textdownstep y
x\textupstep y \textdownstep \textupstep \textglobfall \textglobrise
\textspleftarrow \textdownfullarrow \textupfullarrow
\textsubrightarrow \textsubdoublearrow

\tone{55}\tone{44}\tone{33}\tone{22}\tone{11}
\tone{51}\tone{15}\tone{45}\tone{12}\tone{454}

\texthighrise{a} \textlowrise{a} \textrisefall{a} \textfallrise{a}
Translation
ę o̧ a̍ a̎ n̻ m̩ t̴ t˺ t˹ ə˞ bˊ k< k>
s͍ v͆ n̪͆ t͇ f͈ v͉ s͎ θ͢s m͊ s͌ J͔ J͕
ʔ, ʔ, ʔ, ʔ, ʔ, ʡ, ʖ, ʖ, ʖ, ʖ, ʕ, ʢ
ǀ, ǀ, ǂ, ǂ, ≠, ǁ, !
xˈy xˌy x:y xˑy x‿y xAy xAy AA↘↗A↓↑AA
˥˦˧˨˩
ā́ à̄ à́̀ á̀́
\accentset
Like \underaccent, but the accent is above. This is valid in math
mode only, translation of \accentset xy is
<mover accent='true'><mi>y</mi> <mi>x</mi></mover> (for an
example, see here).
\active
This command is made equal to 13 via \chardef. Use it only when a
number is required. Use it in cases like \catcode~=\active (for an
example, see `\aftergroup <doc-a.html#cmd-aftergroup>`__).
\acute
The \acute command puts an acute accent over a kernel. It works only
in math mode (in text mode, you should use the
\’ command). The math accents recognized by
Tralics are the following
$\acute{x} \bar{x} \breve{x} \check{x}
\ddddot{x} \dddot{x} \ddot{x} \dot{x}
\grave{x} \hat{x} \mathring{x} \tilde{x}
\vec{x} \widehat{xyz} \widetilde{xyz}$
The XML result is
<formula type='inline'>
<math xmlns='http://www.w3.org/1998/Math/MathML'>
<mrow>
<mover accent='true'><mi>x</mi> <mo>´</mo></mover>
<mover accent='true'><mi>x</mi> <mo>‾</mo></mover>
<mover accent='true'><mi>x</mi> <mo>˘</mo></mover>
<mover accent='true'><mi>x</mi> <mo>ˇ</mo></mover>
<mover accent='true'><mi>x</mi> <mo>⃜</mo></mover>
<mover accent='true'><mi>x</mi> <mo>⃛</mo></mover>
<mover accent='true'><mi>x</mi> <mo>¨</mo></mover>
<mover accent='true'><mi>x</mi> <mo>˙</mo></mover>
<mover accent='true'><mi>x</mi> <mo>`</mo></mover>
<mover accent='true'><mi>x</mi> <mo>^</mo></mover>
<mover accent='true'><mi>x</mi> <mo>˚</mo></mover>
<mover accent='true'><mi>x</mi> <mo>˜</mo></mover>
<mover accent='true'><mi>x</mi> <mo>→</mo></mover>
<mover accent='true'><mrow><mi>x</mi><mi>y</mi><mi>z</mi></mrow> <mo>^</mo></mover>
<mover accent='true'><mrow><mi>x</mi><mi>y</mi><mi>z</mi></mrow> <mo>˜</mo></mover>
</mrow>
</math>
</formula>
All these commands are listed in Table 8.12 of the Latex Companion
2. Preview:  (see also
here). Note that
\widehat and
\widetilde are not wide in the current implementation.
Other constructs look like accents, but use large or extensible symbols.
$%
\widetilde{abc} \widehat{abc} \overleftarrow{abc} \overrightarrow{abc}
\overline{abc} \underline{abc} \overbrace{abc} \underbrace{abc}
\underleftarrow{abc} \underrightarrow{abc}
$
The XML result is
<formula type='inline'><math xmlns='http://www.w3.org/1998/Math/MathML'>
<mrow><mover accent='true'><mrow><mi>a</mi><mi>b</mi><mi>c</mi></mrow> <mo>˜</mo></mover>
<mover accent='true'><mrow><mi>a</mi><mi>b</mi><mi>c</mi></mrow> <mo>^</mo></mover>
<mover accent='true'><mrow><mi>a</mi><mi>b</mi><mi>c</mi></mrow> <mo>←</mo></mover>
<mover accent='true'><mrow><mi>a</mi><mi>b</mi><mi>c</mi></mrow> <mo>→</mo></mover>
<mover accent='true'><mrow><mi>a</mi><mi>b</mi><mi>c</mi></mrow> <mo>‾</mo></mover>
<munder accentunder='true'><mrow><mi>a</mi><mi>b</mi><mi>c</mi></mrow> <mo>_</mo></munder>
<mover accent='true'><mrow><mi>a</mi><mi>b</mi><mi>c</mi></mrow> <mo>⏞</mo></mover>
<munder accentunder='true'><mrow><mi>a</mi><mi>b</mi><mi>c</mi></mrow> <mo>⏟</mo></munder>
<munder accentunder='true'><mrow><mi>a</mi><mi>b</mi><mi>c</mi></mrow> <mo>←</mo></munder>
<munder accentunder='true'><mrow><mi>a</mi><mi>b</mi><mi>c</mi></mrow> <mo>→</mo></munder>
</mrow></math></formula>
These commands are listed in Table 8.12 of the Latex
Companion. Preview: 
Other constructs:
$\stackrel{j}{\longrightarrow} \overset{*}{X} \underset{*}{X}
\sqrt{abc} \sqrt[n]{abc} \root n \of{abc}
\frac{abc}{xyz} \dfrac{abc}{xyz}$
The XML result is
<formula type='inline'><math xmlns='http://www.w3.org/1998/Math/MathML'>
<mrow>
<mover><mo>⟶</mo> <mi>j</mi></mover>
<mover><mi>X</mi> <mo>*</mo></mover>
<munder><mi>X</mi> <mo>*</mo></munder>
<msqrt><mrow><mi>a</mi><mi>b</mi><mi>c</mi></mrow></msqrt>
<mroot><mrow><mi>a</mi><mi>b</mi><mi>c</mi></mrow> <mi>n</mi></mroot>
<mroot><mrow><mi>a</mi><mi>b</mi><mi>c</mi></mrow> <mi>n</mi></mroot>
<mfrac><mrow><mi>a</mi><mi>b</mi><mi>c</mi></mrow>
<mrow><mi>x</mi><mi>y</mi><mi>z</mi></mrow>
</mfrac>
<mstyle scriptlevel='0' displaystyle='true'>
<mfrac>
<mrow><mi>a</mi><mi>b</mi><mi>c</mi></mrow>
<mrow><mi>x</mi><mi>y</mi><mi>z</mi></mrow>
</mfrac>
</mstyle>
</mrow>
</math></formula>
Preview: 
\AddAttToIndex (Tralics command)
If you say \AddAttToIndex[idx-name]{att-name}{att-val}, this will
add an attribute pair to the index named idx-name, of the form
att-name='att-val'; see \index for an
example. An alternate name is \addattributetoindex.
\AddAttToDocument (Tralics command)
The \AddAttToDocument command takes two arguments A and B. It adds
A='B' to the attribute list of the document element. It is the same
as \XMLaddatt[1]{A}{B}. Alternate names are
\addattributetodocument or \addattributestodocument. See
`\XMLaddatt <doc-x.html#cmd-XMLaddatt>`__.
\AddAttToCurrent (Tralics command)
The \AddAttToCurrent command takes two arguments A and B. It adds
A='B' to the attribute list of the current element. See the
`xmlelement <doc-x.html#cmd-xmlelement>`__ environment.
\AddAttToCurrrent{X}{Y} is the same as \XMLaddatt{X}{Y}. See
`\XMLaddatt <doc-x.html#cmd-XMLaddatt>`__.
\AddAttToLast (Tralics command)
The \AddAttToLast command takes two arguments A and B. It adds
A='B' to the attribute list of the element created latest. See the
`xmlelement <doc-x.html#cmd-xmlelement>`__ environment. Note that
\AddAttToLast{X}{Y} is the same as
\XMLaddatt[\the\XMLlastid]{X}{Y}. See
`\XMLaddatt <doc-x.html#cmd-XMLaddatt>`__.
\@addnl (Tralics command)
This command inserts a new line character in the XML tree.
\addtocounter
The \addtocounter command takes two arguments, a counter and a value
(see counters in latex). It increments the
value of the counter by the given amount. Modification is always global.
If you say \addtocounter{foo}{10} the result is as if you had said
\global\advance\c@foo 10\relax (see
scanint for details of how \advance
reads a number).
If the calc package is loaded, the result is as if you had said
\calc{\global\advance\c@foo} {10}. Here 10 could be replaced by
2*5. See the calc package for an example.
The example here shows the expansion of the command.
> \newcounter{foo}
> \toks0=\expandafter{\addtocounter{foo}{25}}
> \showthe\toks0
\show: \global \advance \c@foo 25\relax
\addtolength
Instead of \addtolength\foo{10cm}, you can say
\advance\foo 10cm\relax. The result is the same. (see
scandimen for details of how a dimension
or a glue is scanned; if the argument, here \foo, is not a reference
to something that reads an integer, a dimension, a glue or a muglue, a
strange error might be signaled).
If the calc package is loaded, the input is handled as
\calc{\advance\cfoo}{10cm}. See the calc
package for an example.
\addto@hook
Saying \addto@hook\foo{bar} has as effect to add the token list
bar at the end of the hook \foo (a reference to a token list
register). See also \@cons.
\@addtoreset
Saying \@addtoreset{footnote}{chapter} has as effect to reset the
footnote counter whenever the chapter counter is incremented by
\stepcounter. Note that before version 2.13, Tralics did not use
nor modify these two counters. Currently, these counters are incremented
whenever a new chapter or footnote is started, and used by
\thechapter or \thefootnote when computing the id-text
attribute associated to the div or note element.
\addvspace
The \addvspace command takes an argument; it is defined in LaTeX as
follows: outside vertical mode, it provokes an error; inside a minipage
environment it does nothing. Otherwise, let A the value of \lastskip
and B be the value of the argument, converted to a dimension. It A is
zero, then a \vskip of value B is added to the main vertical list.
If A is less than B, two \vskips are added: minus A, then B. If A
and B are negative, nothing is done. If B is negative, and A is
positive, two \vskips are added: minus A, and the sum of A and B.
Note that \vspace 10cm is the same as \vskip10cm\vskip0pt, so
that, after a \vspace \lastskip returns 0.
This command is not implemented, mainly because \lastskip does not
work.
\adjdemerits (internal integer)
When you say \adjdemerits=93, then TeX will use 93 as additional
demerits for a line visually incompatible with the previous one. Unused
by Tralics. (See scanint for details of
argument scanning).
\advance
If you say \global\advance\count0 by 1, the value of \count0 is
globally incremented by 1. The keyword by is optional. Instead of
\count0 you can put any variable that remembers an integer, a
dimension, a glue, or a muglue; after the optional by an integer (a
dimension, a glue, or a muglue, depending on the case) is scanned. Note
that you cannot put, after \advance, a command that reads a
restricted integer (for instance, \catcode, and such).
\ae (constant)
The \ae command generates the æ character, this is also æ.
This character is valid in math mode also. For details, see the latin
supplement characters.
\AE (constant)
The \AE command generates the Æ character, this is also Æ.
This character is valid in math mode also. For details, see the latin
supplement characters.
\afterassignment
When you say \afterassignment\foo, the token \foo is saved
somewhere, and used just after the next assignment. Unlike
\aftergroup, this token is not saved on the stack, so that in the
case of two consecutive \afterassignment, the first one is lost.
Example:
\def\foo{123}
\afterassignment\foo\setbox0=\hbox{4}
In this case, the assignment is considered complete when the open brace
is read after \hbox. Thus box0 will contain 1234. A typical use of
\afterassignment is given here.
\makeatletter
\def\openup{\afterassignment\@penup\dimen@=}
\def\@penup{\advance\lineskip\dimen@
  \advance\baselineskip\dimen@
  \advance\lineskiplimit\dimen@}
\makeatother
\openup1234pt
In LaTeX, you would say:
\def\Openup#1{\addtolength{\lineskip}{#1}
  \addtolength{\baselineskip}{#1}
  \addtolength{\lineskiplimit}{#1}}
\Openup{1234pt}
but this definition is less efficient. Of course, \Openup could read
an argument, put the result in \dimen@, and call \advance. The
reason for \afterassignment is that the argument of \openup is
not delimited by braces: the scandimen
routine reads as many tokens as needed. The commands \vglue,
\hglue, and \magnification use this same trick.
Other example. This is \settabs, from plain, where some macros have
been renamed.
\def\settabs{... \futurelet\nexttoken\settab@I}
\def\settab@I{\ifx\nexttoken\+%
  \def\nextcmd{\afterassignment\settab@II\let\nextcmd}%
  \else\let\nextcmd\s@tcols\fi
  \let\nexttoken\relax
  \nextcmd}
\def\settab@II{\let\nextcmd\relax action}
\def\s@tcols#1\columns{action}
The idea is the following: \settabs is either followed by a sample
line (that starts with \+), or something like 25\columns. The
effect of \futurelet \nexttoken \settab@I is to read the next token
(\+ or 2), put it in \nexttoken, push it back in the input
stream, and call \settab@I. This command tests whether the token is
\+ or not, it sets \nextcmd, kills \netxttoken, and calls
\nextcmd. When you say \settabs 25\columns, the \s@tcols
command is called with a delimited argument. Otherwise, we see the
\afterassignment\settab@II, followed by \let\nextcmd. This is an
assignment: it puts in \nextcmd the token that follows (the \+)
then calls \settab@II, that kills \nextcmd and does some action.
There are two problems here: check whether the next token is \+, and
read it. It is not possible to read this token as an argument because
the token is \outer. On the other hand, both \nextcmd and
\nexttoken have to be killed (made equivalent to \relax) because
it is unwise to have useless \outer tokens. In the TeXbook, Knuth
uses one token \next instead of two tokens \nextcmd and
\nexttoken, why?
Other example (from the LaTeX source)
\def\restore@protect{\let\protect\@@protect}
\def\protected@edef{%
   \let\@@protect\protect
   \let\protect\@unexpandable@protect
   \afterassignment\restore@protect
   \edef
}
Hence \protected@edef\foo{\bar} is the same as
\let\copy@of@protect \protect
\let\protect \a@protect@designed@for@edef
\edef\foo{\bar}
\let\protect \copy@of@protect
\@afterfi, \@afterelsefi
Assume that you want to use conditionnaly a command, you can do this
\ifnum\count0=0 \foo\else\bar\fi. This works only if the command
takes no argument, otherwise you must use something more complicated
like \ifnum\count0=0 \expandafter\foo\else\expandafter\bar\fi. The
situation is worse if the command takes two arguments, one before and
one after the conditional. The two commands \@afterelsefi and
\@afterfi can be placed before \foo and \bar, the effect is
to read all relevant tokens (until \else or \fi), discard the
unwanted ones (those between \else and \fi, if the condition is
true), terminate the condition, and re-insert the tokens. Example
\def\xfoo#1#2{\def\testa{x#1#2}}
\def\yfoo#1#2{\def\testb{y#1#2}}
\def\test#1{\ifnum0=#1 \@afterelsefi\xfoo u \else\@afterfi\yfoo v\fi}
% run the test
\test0a \test1b
% check
\def\testA{xua}\def\testB{yvb}
\ifx\testa\testA\else\bad\fi
\ifx\testb\testB\else\bad\fi
\aftergroup
When you say \aftergroup, a token is read, and pushed on the save
stack. At the end of the group, the token is pushed back in the input
stream. Example.
{\def\A{A}\def\B{B}\def\C{C}
{\def\A{AA}\def\B{BB}\def\C{CC}\aftergroup\A \aftergroup\B\C}}
The translation is CCAB.
In fact, \C expands to CC. After that the closing brace has as
effect to unwind the stack: old definitions of \A, \B and \C
are restored, and the tokens \A and \B are inserted in the
stream. Elements are popped in the reverse order as they were pushed:
\B is inserted first, and \A is restored last. Since \A is
popped after \B it is the first token to be read again. This is what
the transcript file says:
{end-group character}
+stack: after group \B
+stack: after group \A
+stack: restoring \C=macro:->C.
+stack: restoring \B=macro:->B.
+stack: restoring \A=macro:->A.
This is an example from the TeXbook, appendix D, instantiated with
\n=5. It is equivalent to \edef\ast{*****}.
\countdef\n 3
\n=5
\begingroup\aftergroup\edef\aftergroup\asts\aftergroup{
\loop\ifnum\n>0 \aftergroup*\advance\n-1 \repeat
\aftergroup}\endgroup
As the transcript file below shows, the result is formed of the three
tokens \edef\asts{, followed by N copies of *, followed by
}. These things are gathered when \endgroup is seen. Since the
\loop is local to the group, two quantities are restored: a command
named \iterate and the counter.
+stack: after group {Character } of catcode 2}
+stack: after group {Character * of catcode 12}
+stack: after group {Character * of catcode 12}
+stack: after group {Character * of catcode 12}
+stack: after group {Character * of catcode 12}
+stack: restoring \count3=5.
+stack: after group {Character * of catcode 12}
+stack: killing \iterate
+stack: after group {Character { of catcode 1}
+stack: after group \asts
+stack: after group \edef
Other example (simplified version of \verb). Consider the following
definitions
{\catcode`\^^M=\active % these lines must end with %
  \gdef\obeylines{\catcode`\^^M\active \let^^M\par}%
  \global\let^^M\par} % this is in case ^^M appears in a \write
\begingroup
  \obeylines%
  \gdef\VEE{\obeylines  \def^^M{\verbegroup \verberrorA}}%
\endgroup
\let\VBG\empty
\def\verbegroup{\global\let\VBG\empty\egroup}
This defines \obeylines, whose effect is to make the new line an
active character, equivalent to \par. After that it defines \VEE
whose effect is to make the newline character active, and its value is
now \verbegroup\verberror. The effect of \verbegroup is to reset
(globally) \VBG to empty, and terminate the current group. The other
command signals an error. Consider now:
\def\sverb{\bgroup \VEE \tt \ssverb}
\def\ssverb#1{%
  \catcode`#1\active
  \lccode`\~`#1%
  \gdef\VBG{\verbegroup\verberrorB}%
  \aftergroup\VBG
  \lowercase{\let~\verbegroup}}%
When you say \sverb x y x the following happens. A group is opened,
some commands are executed, and \ssverb is called, with argument x.
(In LaTeX, some category codes are changed, including the space
character; as a result, the space that follows the command is no more
ignored, and can be used as delimiter. As a consequence, no letter can
be a delimiter). The letter x is made active, and defined to be
\verbegroup. Moreover \VBG is defined to some command and saved
for after group.
Assume that, as in the example, x is seen, hence executed. The
\verbegroup command kills \VBG and executes \egroup. This
\egroup has some side effects: it restores the \catcode of x,
the current font, and whatever is needed. The \VBG token inserted by
\aftergroup has no effect.
Assume that we have defined \def\test#1{{#1}} and say
\test{\sverb x y x}. Note that the \catcode of the second x does
not change, so that this x does not behave as above. When the brace of
\test is evaluated, the category code of x is restored, and \VBG
is executed. It calls \verbegroup (hence terminates the group opened
by \sverb), then signals an error.
Same example, with \def\test#1{#1} instead. It is likely that there
is no other x on the line that contains \test{\sverb x y x}, so that
the end-of-line character is active, and calls
\verbegroup \verberrorA. Thus a different error is signaled. This is
the log file for the second example, with some comments added.
\test#1->{#1}
#1<-\sverb x y x
{begin-group character}
+stack: level + 3 for brace entered on line 28
\sverb-> \bgroup \VEE \tt \ssverb
{begin-group character}
+stack: level + 4 for brace entered on line 28
\VEE->\obeylines \def ^^M{\verbegroup \verberrorA }
\obeylines->\catcode `\^^M\active \let ^^M\par
{\catcode}
+scanint for \catcode->13 % this is ASCII code of ^M
+scanint for \catcode->13 % this is \active
{changing \catcode13=5 into \catcode13=13}
{\let}
{\let ^^M \par}
{changing ^^M=\par}
{into ^^M=\par}
{\def}
{changing ^^M=\par}
{into ^^M=macro:->\verbegroup \verberrorA }
{\tt}
{font change \ttfamily}
\ssverb#1->\catcode `#1\active \lccode `\~`#1\gdef \VBG {\verbegroup \verberrorB }
\aftergroup \VBG \lowercase {\let ~\verbegroup }
#1<-x
{\catcode}
+scanint for \catcode->120 % this is ASCII code of x
+scanint for \catcode->13 % this is \active
{\lccode}
{changing \catcode120=11 into \catcode120=13}
+scanint for \lccode->126% this is ASCII code of ~
+scanint for \lccode->120% this is ASCII code of x
{changing \lccode126=0 into \lccode126=120}
{\gdef}
{globally changing \VBG=macro:->}
{into \VBG=macro:->\verbegroup \verberrorB }
{\aftergroup}
{\lowercase}
{\lowercase(a)->\let ~\verbegroup }
{\lowercase->\let x\verbegroup }
{\let}
{\let x \verbegroup}
{changing x=undefined}
{into x=macro:->\global \let \VBG \empty \egroup }
Character sequence:  y x.
{end-group character}% closing brace of \test
+stack: killing x.
+stack: after group \VBG
+stack: restoring \lccode126=0. % the \lccode of ~
+stack: restoring \catcode120=11. % the \catcode of x
{Text:  y x} % These are the chars affected by \tt, there are two spaces
+stack: restoring current font .
+stack: restoring ^^M=\par.
+stack: restoring \catcode13=5.
+stack: level - 4 for brace  from line 28
\VBG->\verbegroup \verberrorB
\verbegroup->\global \let \VBG \empty \egroup
{\global}
{\global\let}
{\let \VBG \empty}
{globally changing \VBG=macro:->\verbegroup \verberrorB }
{into \VBG=macro:->}
{end-group character}
+stack: level - 3 for brace for brace from line 28
% this is followed by: Undefined command \verberrorB
\aleph (math symbol)
The \aleph command is valid only in math mode. It generates a
miscellaneous symbol (Hebrew letter aleph): <mo>ℵ</mo>
(Unicode U+2135, ℵ), that renders like  . See description of
the
`\ldots <doc-l.html#cmd-ldots>`__ command.
align, flalign, alignat, xalignat, xxalignat (math environment)
The align environment (provided by the amsmath package) is used for
two or more equations when vertical alignment is desired at n points
(one in the example below). \begin{align} X&Y \end{align} is
equivalent to $$\begin{array}{rl} X&Y \end{array}$$. (equation
number does not work well in version 2.13). There are variants:
flalign, alignat, xalignat and xxalignat. The last two
environments are considered obsolete by amsmath. The three last
environments take an optional argument (ignored by Tralics), the value
of n. Note that Tralics assumes n=5, so that if you use more
than ten columns, they will lack an alignment attribute. There are
unnumbered variants align*, etc. The xxalignat environment
occupies the whole width of the page, there is no place for an equation
number, so is always unnumbered, and has no starred version (in
Tralics all these environments behave the same). Example
\begin{align}
x^2+y^2&=1\\ x&=\sqrt{1-y^2}
\end{align}
Translation
<formula type='display'>
 <math mode='display' xmlns='http://www.w3.org/1998/Math/MathML'>
  <mtable displaystyle='true'>
   <mtr>
    <mtd columnalign='right'>
     <mrow><msup><mi>x</mi> <mn>2</mn> </msup>
        <mo>+</mo><msup><mi>y</mi> <mn>2</mn> </msup>
     </mrow>
    </mtd>
    <mtd columnalign='left'><mrow><mo>=</mo><mn>1</mn></mrow></mtd>
   </mtr>
   <mtr>
    <mtd columnalign='right'><mi>x</mi></mtd>
    <mtd columnalign='left'>
     <mrow><mo>=</mo><msqrt><mrow><mn>1</mn><mo>-</mo><msup><mi>y</mi>
        <mn>2</mn> </msup></mrow></msqrt>
     </mrow>
    </mtd>
   </mtr>
  </mtable>
 </math>
</formula>
Preview: 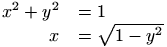 . (see also here).
aligned (environment)
The aligned environment produces a display table (as align), a
table that has an attribute that says this is a display table, and each
cell is typeset in display style. Cells are alternatively right and left
aligned. This environment must be used in a math formula. There is an
optional argument that indicates vertical aligned (currently ignored by
Tralics). Example
\begin{equation}
\begin{aligned}[x]
x^2+y^2&=1& 1&=X^2+Y^2\\
x&=0.01&0.001=X
\end{aligned}
\end{equation}
Translation
<formula id-text='3' id='uid3' type='display'>
 <math mode='display' xmlns='http://www.w3.org/1998/Math/MathML'>
  <mtable displaystyle='true'>
   <mtr>
    <mtd columnalign='right'>
      <mrow><msup><mi>x</mi> <mn>2</mn> </msup><mo>+</mo><msup><mi>y</mi>
            <mn>2</mn> </msup></mrow></mtd>
    <mtd columnalign='left'><mrow><mo>=</mo><mn>1</mn></mrow></mtd>
    <mtd columnalign='right'><mn>1</mn></mtd>
    <mtd columnalign='left'>
       <mrow><mo>=</mo><msup><mi>X</mi> <mn>2</mn> </msup><mo>+</mo><msup>
            <mi>Y</mi> <mn>2</mn> </msup></mrow></mtd>
   </mtr>
   <mtr>
    <mtd columnalign='right'><mi>x</mi></mtd>
    <mtd columnalign='left'><mrow><mo>=</mo><mn>0</mn><mo>.</mo><mn>01</mn></mrow></mtd>
    <mtd columnalign='right'>
      <mrow><mn>0</mn><mo>.</mo><mn>001</mn><mo>=</mo><mi>X</mi></mrow></mtd>
   </mtr>
  </mtable>
 </math>
</formula>
Preview:  . (see also here).
\allowbreak
The translation of \allowbreak is <allowbreak/> since version
2.9.4. In previous versions, the command was ignored.
\Alph, \@Alph
The \Alph command takes as argument a counter (see counters in
latex), and typesets its value as a uppercase
letter. The value of the counter has to be between 1 and 26. See example
below.
The expansion of \Alph{foo} is \@Alph\c@foo and \@Alph calls
scanint in order to get a number. The
expansion is a letter (of category code 11).
\alph, \@alph
The \alph command takes as argument a counter (see counters in
latex), and typesets its value as a lower case
letter. The value of the counter has to be between 1 and 26.
The expansion of \alph{foo} is \@alph\c@foo and \@alph calls
scanint in order to get a number. The
expansion is a letter (of \catcode 11).
In the example that follows, we show different ways to typeset a
counter. We put \fnsymbol in a math formula and outside it; the
documentation says: “may be used only in math mode” but the code says
\ensuremath{...}.
\def\showcounter#1{%
\arabic{#1} \roman{#1} \Roman{#1} \alph{#1} \Alph{#1} \fnsymbol{#1}  $\fnsymbol{#1}$\\}
\newcounter{ctr}
\stepcounter{ctr}\showcounter{ctr}
\stepcounter{ctr}\showcounter{ctr}
\stepcounter{ctr}\showcounter{ctr}
\stepcounter{ctr}\showcounter{ctr}
\stepcounter{ctr}\showcounter{ctr}
\stepcounter{ctr}\showcounter{ctr}
\stepcounter{ctr}\showcounter{ctr}
\stepcounter{ctr}\showcounter{ctr}
\stepcounter{ctr}\showcounter{ctr}
Preview: 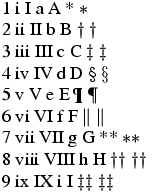 (see also here)
\alpha (math symbol)
The \alpha command is valid only in math mode. It generates a Greek
letter: <mi>α</mi> (Unicode U+3B1, α) that renders like
 . The TeXbook mentions
\Alpha, \Beta, which could be
defined as {\rm A}{\rm B}; in Tralics, the preferred way is to use
ΑΒ (UTF8 encoding) or ^^^^0391^^^^0392 (ASCII encoding).
Tralics recognizes the following letters:
$\alpha \beta \gamma \delta \epsilon \varepsilon \zeta \eta
\theta \iota \kappa \lambda \mu \nu \xi \pi \rho \sigma \tau
\upsilon \phi \chi \psi \omega \varpi \varrho \varsigma \varphi
\varkappa \vartheta$
$\Gamma \Delta \Theta \Lambda \Xi \Sigma \Upsilon \Phi \Pi \Psi \Omega$
The XML result is
<formula type='inline'><math xmlns='http://www.w3.org/1998/Math/MathML'>
<mrow><!-- lowercase -->
<mi>α</mi> <mi>β</mi> <mi>γ</mi> <mi>δ</mi>
<mi>ϵ</mi> <mi>ϵ</mi> <mi>ζ</mi> <mi>η</mi> <mi>θ</mi>
<mi>ι</mi> <mi>κ</mi> <mi>λ</mi> <mi>μ</mi> <mi>ν</mi>
<mi>ξ</mi> <mi>π</mi> <mi>ρ</mi> <mi>σ</mi> <mi>τ</mi>
<mi>υ</mi> <mi>φ</mi> <mi>χ</mi> <mi>ψ</mi> <mi>ω</mi> <mi>ϖ</mi>
<mi>ϱ</mi> <mi>ς</mi> <mi>ϕ</mi> <mi>ϰ</mi> <mi>ϑ</mi>
</mrow></math></formula>
<formula type='inline'><math xmlns='http://www.w3.org/1998/Math/MathML'>
<mrow> <!-- uppercase -->
<mi>Γ</mi> <mi>Δ</mi> <mi>Θ</mi> <mi>Λ</mi>
<mi>Ξ</mi> <mi>Σ</mi> <mi>ϒ</mi> <mi>Φ</mi> <mi>Π</mi> <mi>Ψ</mi>
<mi>Ω</mi> </mrow></math></formula>
All the entities used above are defined in the isogrk3.ent file. All
commands are listed in Table 8.3 of the Latex
Companion, except \varkappa. If you do not
like entity names, you can pass the switch -noentnames to the
executable, and the translation will be:
<formula type='inline'><math xmlns='http://www.w3.org/1998/Math/MathML'>
<mrow>
<mi>α</mi><mi>β</mi><mi>γ</mi><mi>δ</mi>
<mi>ϵ</mi><mi>ε</mi><mi>ζ</mi><mi>η</mi>
<mi>θ</mi><mi>ι</mi><mi>κ</mi><mi>λ</mi>
<mi>μ</mi><mi>ν</mi><mi>ξ</mi><mi>π</mi>
<mi>ρ</mi><mi>σ</mi><mi>τ</mi><mi>υ</mi>
<mi>ϕ</mi><mi>χ</mi><mi>ψ</mi><mi>ω</mi>
<mi>ϖ</mi><mi>ϱ</mi><mi>ς</mi><mi>φ</mi>
<mi>ϰ</mi><mi>ϑ</mi><mi>Γ</mi><mi>Δ</mi>
<mi>Θ</mi><mi>Λ</mi><mi>Ξ</mi><mi>Σ</mi>
<mi>Υ</mi><mi>Φ</mi><mi>Π</mi><mi>Ψ</mi>
<mi>Ω</mi>
</mrow></math>
</formula>
The browser show these characters as α β γ δ ϵ ε ζ η θ ι κ λ μ ν ξ π ρ σ τ υ ϕ χ ψ ω ϖ ϱ ς φ ϰ ϑ Γ Δ Θ Λ Ξ Σ Υ Φ Π Ψ Ω.
\amalg (math symbol)
The \amalg command is valid only in math mode. It generates a binary
operator (looks like reverse \Pi): <mo>⨿</mo> (Unicode
U+2A3F, ⨿) that renders like  . See description of the
`\pm <doc-p.html#cmd-pm>`__ command.
\amp
The \amp command expands to the character & of category code letter.
Normally, the translation is &. For instance, in math mode
\mathmi{\&\#xAB;} translates into a <mi> element containing an
ampersand character, a sharp character, three letters and a semi-colon;
but \mathmi{\amp\#xAB;} contains a character entity (you must be
careful, because this can produce invalid XML, here we a have an opening
guillemet). In math mode, entities should be constructed only inside
commands similar to \mathmi (that read the argument in a special
manner). In text mode, you can say \xmllatex{\&\#xAB;}{}.
\anchor (Tralics command)
The \anchor command defines an anchor. (see syntax below, under
\anchorlabel). Its translation is
<anchor id='uid13' id-text='17'/>, unless the current element is an
anchor. When you say \label{foo} the label is remembered with its
anchor, when you say \ref{foo}, a reference to the anchor is
generated. By default an anchor is associated to each section, figure,
table, footnote, item, formula, etc, and the \anchor command is
generally useless. In Tralics anchors are characterized by their id (a
unique string is used instead of xx), and there is a table that
associates the name foo and the id. At the end of the document, an
error is signalled for missing anchors. Since version 2.13.2, each
anchor has an id-text. If the anchor comes from, say an equation, the
id-text is the value of \theequation (after the equation counter has
been updated). A unique number is used in the case of \anchor,
unless an optional argument is given.
When the XML document is converted to HTML or pdf, or whatever, the
translation of the \ref is in general the following: the element
referenced to by the id is fetched, and used to produce a value, for
instance the section number, the figure number, the footnote number,
etc. In general, the number of predecessors are counted.
In the case of \pageref{foo}, you expect to see the page number
where the label is defined; in LaTeX, this is achieved as follows: each
label prints a line in the aux file, with two items: the first contains
the value used by \ref, and the second the value used by
\pageref (namely the page number). Two passes are required for the
compilation. More information is printed if you use the hyperref
package, because links can be active; in some cases, this does not work
well, because the anchor is not on the same page as the label.
The effect of \index{bar} is the following: add an anchor to the
current point, and construct a sorted index at the end of the document
with a reference to the anchor. Traditionally, this is a \pageref
(if the word is referenced more than once on the same page, only a
single page number is shown). In Tralics, an active link is created.
You could write the \index command using TeX macros (the non-trivial
point is how to sort; it is not guaranteed that the ordering is the same
as that of the makeindex program). For this reason, you can use
\anchor and \pageref.
We recommend to put the label as near as possible to the anchor. This is
mainly because the scope of the anchor is not well defined; in LaTeX,
the value used by \pageref is, as said above, the page number of the
page containing the label, but \ref uses the content of a macro
(that is local to the current environment). Additional parameters used
by hyperref behave in a similar way. Equation numbers and the like are
globally incremented. In Tralics, anchors are local to the current
element. For instance, if you start a figure (via \begin{figure}),
an anchor is created, it becomes the current anchor, until you close the
figure element via \end{figure}. This anchor is independent of any
\caption present in the environment or elsewhere.
\anchorlabel (Tralics command)
This command essentially behaves like \anchor followed by
\label. Both commands \anchor and \anchorlabel take an
optional argument, preceded by an optional star; \anchorlabel takes
a mandatory argument. See example below. Each call increments a counter.
Assume that the counter is 17. This will be the default value of the
optional argument. Each anchor has a unique id, of the form uid13. If
the last constructed XML element is not an anchor, then \anchor will
construct <anchor id='uid13' id-text='17'/>, and the next label
will refer to this element. If the last constructed XML element is an
anchor, no new anchor is created (example on the first line). If the
command is followed by a star, the two attributes
id='uid13' id-text='17' will be added to the current XML element (in
the example below, the paragraphs). In a previous version, you say
\ref{aid17} and it worked; this feature has been removed since it is
has to know the number 17, and the code is commented out; on the other
hand \anchorlabel creates a label that points to this anchor. Note
that the scope of the anchor is limited to the current element. For
instance \label{zz} is out of scope. Tralics generates no error,
but uses uid1 in this case. If you remove the percent characters on the
first line, the translation will be the same, except that the section
will create a <div0 id-text='1' id='cid1'> element, which will
become the anchor of \label{zz}.
%%  \section{aaa}
xx \anchor[foo]\anchor[foo2]\\label{a}
yy \anchor*[bar]\label{b}
\ref{a}\ref{b} %\ref{aid1}

zz\label{zz}\ref{zz}\anchor

xx \anchorlabel{a2}
yy \anchorlabel*[bar]{b2}
\ref{a2}\ref{b2}%\ref{aid2}
<p id-text='bar' id='uid2'>xx <anchor id-text='foo' id='uid1'/>
yy
<ref target='uid1'/><ref target='uid2'/></p>
<p>zz<ref target='uid1'/><anchor id-text='4' id='uid3'/></p>
<p id-text='bar' id='uid5'>xx <anchor id-text='5' id='uid4'/>
yy
<ref target='uid4'/><ref target='uid5'/></p>
Since version 2.15.4, Tralics refuses to put an equation number to
math formulas introduced by $, $$, \[,
\begin{equation*), etc. In this case, you can use \anchorlabel;
this will add an anchor to the <formula> element. On the other hand
\anchorlabel* is allowed anywhere (and more than once) in every math
formula. The anchor should be associated to the current MathML element,
but this is not yet possible, so an empty <mrow> serves as anchor.
The command \anchor is illegal in math mode.
$x\anchorlabel{l1}$
\[x\anchorlabel[a2]{l2}\]
\[ \frac{x\anchorlabel*[num]{l3}}{x\anchorlabel*[den]{l4}}  \]
\ref{l1}\ref{l2}\ref{l3}\ref{l4}
<p>
  <formula id-text='1' id='uid1' type='inline'>
    <math xmlns='http://www.w3.org/1998/Math/MathML'>
      <mi>x</mi></math>
  </formula>
</p>
<formula id-text='a2' id='uid2' type='display'>
  <math mode='display' xmlns='http://www.w3.org/1998/Math/MathML'>
    <mi>x</mi>
  </math>
</formula>
<formula type='display'>
  <math mode='display' xmlns='http://www.w3.org/1998/Math/MathML'>
    <mfrac>
      <mrow><mi>x</mi><mrow id-text='num' id='uid3'/></mrow>
      <mrow><mi>x</mi><mrow id-text='den' id='uid4'/></mrow>
    </mfrac>
  </math>
</formula>
<p noindent='true'><ref target='uid1'/><ref target='uid2'/><ref target='uid3'/><ref target='uid4'/></p>
\and
The command \and is usually used to separate authors in the
\author command. Not implemented in Tralics. It can be used as
boolean connector inside conditionals defined by
`\ifthenelse <doc-i.html#cmd-ifthenelse>`__.
\AND
The command \AND can be used as boolean connector (equivalent to
\and) inside conditionals defined by
`\ifthenelse <doc-i.html#cmd-ifthenelse>`__.
\angle (math symbol)
The \angle command is valid only in math mode. It generates a
miscellaneous symbol: <mo>∠</mo> (Unicode U+2220, ∠) that
renders like  . See description of the
`\ldots <doc-l.html#cmd-ldots>`__ command.
\anodeconnect
The \anodeconnect[f]{F}[t]{T} construction connects node F to node T
(bottom of first node is connected to top of second node, unless
specified by positions f and t). Translation is <anodeconnect>. See
`\abarnodeconnect <#cmd-abarnodeconnect>`__ for syntax and example.
\anodecurve
The \anodecurve[f]{F}[t]{T}{d1}[d2] is like \anodeconnect,
translates into <anodecurve> element, with two more parameters d1
and d2 (default value of d2 is d1). See
`\abarnodeconnect <#cmd-abarnodeconnect>`__ for syntax and example.
\aparaitre (Tralics command)
The \aparaitre command translates into à paraître or
to appear depending on the current language.
\apostrophe
This is the same as \char"B4. This produces an apostrophe. This can
be interesting in cases where Tralics tries to replace the apostrophe
character by something else.
\approx (constant)
The \approx command is valid only in math mode. It generates a
relation symbol (like a double \sim): <mo>≈</mo> (Unicode
U+2248, ≈) that renders like  . See description of the
`\le <doc-l.html#cmd-le>`__ command.
\approxeq (constant)
The \approx command is valid only in math mode. It generates a
relation symbol (like a double \sim): <mo>≊</mo>
(Unicode U+224A, ≊).
\ApplyFunction (math symbol)
The \ApplyFunction command is valid only in math mode, it produces
<mo>⁡</mo> (Unicode U+2061, ). This is an invisible
character that can be put between a function and its argument.
\arabic
The \arabic command takes as argument a counter (see counters in
latex), and typesets its value using normal
(arabic) characters. For an example see the
`\alph <doc-a.html#cmd-alph>`__ command.
The expansion of \arabic{foo} is \number\c@foo and \number
calls scanint in order to get a number. The
expansion is a sequence of digits, with an optional minus sign (of
catcode code 12).
The \@arabic command is the same as the \number command. If you
say \pagenumbering{foo}, then \thepage is redefined as
\@foo\c@page. You can replace `foo’ by `arabic’.
\arc
The \arc command is defined by the curves package. This is an
extension of the epic package.
The syntax is \arc[nbsymb](x1,y1){angle}. The optional argument is
not described here. The command draws a circular arc centered at the
current position starting at (x1,y1) and proceeding counterclockwise
for angle degrees. The translation is something like
<pic-arc angle='-135' xpos='0' ypos='-1.' nbsymb='3' unit-length='1.4'>.
Here xpos and ypos are the values obtained by multiplying the argument
by the current value of \unitlength.
The syntax of \bigcircle is \bigcircle[nbsymb]{diameter}, where
the optional argument is as above. It draws a circle with a diameter
equal to diameter times \unitlength. The translation may be
<pic-bigcircle size='10' unit-length='5.12149'>. Here the size
attribute is the diameter, and the second attribute is the current
unit-length (expressed in points).
The syntax of \curve is \curve[nbsymb](x1,y1,x2,y2, ...,xn,yn).
The optional parameter is as above. This command draws a curve through
the specified coordinates. Two pairs of coordinates generate a straight
line, three pairs a parabola, going through the points specified. The
translation may be:
<pic-curve unit-length='0.4'>300,0, 340,100, 380,0</pic-curve>. Note
that Tralics does nothing special with the argument. This is the
reason why the current value of \unitlength is inserted.
The syntax of \closecurve is similar. The command draws a closed
curve with continuous tangents at all points. At least six coordinates
are required.
The syntax of \tagcurve is similar. The command draws a curve
without its first and last segments. If only three coordinate points are
specified, then it draws the last segment only.
The four commands \xscale, \xscaley, \yscalex and
\yscale are defined to be respectively 1, 0, 0 and 1. They are used
by \scaleput.
The \scaleput(x,y){object} command places the picture object at
position (x,y). At the same time it applies an axonometric projection
or rotation specified by \xscale, \xscaley, \yscalex and
\yscale. The translation may be
<pic-scaleput xpos='51.2149' ypos='51.2149' xscale='1' yscale='0.6' xscaley='-1' yscalex='0.6'>...</pic-scaleput>.
Note that the scale parameters are not used, they are just copied. On
the other hand, the position is multiplied by the value of
\unitlength.
This is an example of the three types of curves (example 10-1-24 of TLC2, but images are swapped).
\setlength{\unitlength}{0.4pt}
\linethickness{0.7mm}
\begin{picture}(400,110)(-10,0)
  \tagcurve(80,0, 0,0, 40,100, 80,0, 0,0)
  \closecurve(150,0, 190,100, 230,0)
  \curve(300,0, 340,100, 380,0)
\end{picture}
Translation
<picture xpos='-3.99994' ypos='0' width='159.99756' height='43.99933'>
  <pic-tagcurve unit-length='0.4'>80,0, 0,0, 40,100, 80,0, 0,0</pic-tagcurve>
  <pic-closecurve unit-length='0.4'>150,0, 190,100, 230,0</pic-closecurve>
  <pic-curve unit-length='0.4'>300,0, 340,100, 380,0</pic-curve>
</picture>
Preview: 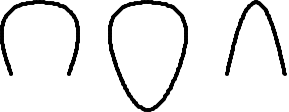
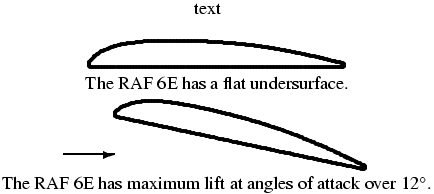
This is an example explaining \scaleput. The image appear in LaTeX
companion, first edition, page 291-292, but the numbers are taken from
the documentation of the curves package.
\newcommand{\RAFsixE}{
  \scaleput(1.25,1.25){\arc(0,-1.25){-135}}
  \scaleput(0,0){\curve(0.366,2.133, 1.25,3.19, 2.5,4.42,
    5.0,6.10, 7.5,7.24, 10,8.09, 15,9.28, 20,9.90, 30,10.3,
    40,10.22, 50,9.80, 60,8.98, 70,7.70, 80,5.91, 90,3.79,
    95,2.58, 99.24,1.52)}
  \scaleput(99.24,0.76){\arc(0,-0.76){180}}
  \scaleput(0,0){\curve(1.25,0, 99.24,0)}
  }
\setlength{\unitlength}{.5mm}
\linethickness{0.7mm}
\begin{center}
text\\
  \begin{picture}(100,20)
    \RAFsixE
  \end{picture}
  \\The RAF 6E has a flat undersurface.
\\
  \begin{picture}(120,30)(-20,0)
  \renewcommand{\xscale}{0.9781}
  \renewcommand{\xscaley}{0.2079}
  \renewcommand{\yscale}{0.9781}
  \renewcommand{\yscalex}{-0.2079}
  \put(0,20){\RAFsixE}
  \thicklines
  \put(-20,5){\vector(1,0){20}}
  \end{picture}
\\
  The RAF 6E has maximum lift at angles of attack over 12$^\circ$.
  \end{center}
Translation
<pic-linethickness size='0.7mm'/>
<p rend='center'>text</p>
<p rend='center'>
<picture width='142.26227' height='28.45245'>
<pic-scaleput xpos='1.77827' ypos='1.77827' xscale='1.0' yscale='1.0' xscaley='0.0' yscalex='0.0'>
<pic-arc angle='-135' xpos='0' ypos='-1.77827' unit-length='1.42262'/>
</pic-scaleput>
<pic-scaleput xpos='0' ypos='0' xscale='1.0' yscale='1.0' xscaley='0.0' yscalex='0.0'>
<pic-curve unit-length='1.42262'>0.366,2.133, 1.25,3.19, 2.5,4.42,
5.0,6.10, 7.5,7.24, 10,8.09, 15,9.28, 20,9.90, 30,10.3,
40,10.22, 50,9.80, 60,8.98, 70,7.70, 80,5.91, 90,3.79,
95,2.58, 99.24,1.52</pic-curve>
</pic-scaleput>
<pic-scaleput xpos='141.18108' ypos='1.08118' xscale='1.0'
yscale='1.0' xscaley='0.0' yscalex='0.0'>
<pic-arc angle='180' xpos='0' ypos='-1.08118' unit-length='1.42262'/>
</pic-scaleput>
<pic-scaleput xpos='0' ypos='0' xscale='1.0' yscale='1.0' xscaley='0.0' yscalex='0.0'>
<pic-curve unit-length='1.42262'>1.25,0, 99.24,0</pic-curve>
</pic-scaleput>
</picture>
</p>
<p rend='center'>The RAF 6E has a flat undersurface.</p>
<p rend='center'>
<picture xpos='-28.45245' ypos='0' width='170.71472' height='42.67868'>
<pic-put xpos='0' ypos='28.45245'>
<pic-scaleput xpos='1.77827' ypos='1.77827' xscale='0.9781'
yscale='0.9781' xscaley='0.2079' yscalex='-0.2079'>
<pic-arc angle='-135' xpos='0' ypos='-1.77827' unit-length='1.42262'/>
</pic-scaleput>
<pic-scaleput xpos='0' ypos='0' xscale='0.9781' yscale='0.9781' xscaley='0.2079' yscalex='-0.2079'>
<pic-curve unit-length='1.42262'>0.366,2.133, 1.25,3.19, 2.5,4.42,
5.0,6.10, 7.5,7.24, 10,8.09, 15,9.28, 20,9.90, 30,10.3,
40,10.22, 50,9.80, 60,8.98, 70,7.70, 80,5.91, 90,3.79,
95,2.58, 99.24,1.52</pic-curve>
</pic-scaleput>
<pic-scaleput xpos='141.18108' ypos='1.08118' xscale='0.9781'
yscale='0.9781' xscaley='0.2079' yscalex='-0.2079'>
<pic-arc angle='180' xpos='0' ypos='-1.08118' unit-length='1.42262'/>
</pic-scaleput>
<pic-scaleput xpos='0' ypos='0' xscale='0.9781' yscale='0.9781' xscaley='0.2079' yscalex='-0.2079'>
<pic-curve unit-length='1.42262'>1.25,0, 99.24,0 </pic-curve>
</pic-scaleput>
</pic-put>
<pic-thicklines/>
<pic-put xpos='-28.45245' ypos='7.11311'>
<pic-vector xdir='1' ydir='0' width='28.45245'/>
</pic-put>
</picture>
</p>
<p rend='center'>The RAF 6E has maximum lift at angles of attack over 12
<formula type='inline'>
<math xmlns='http://www.w3.org/1998/Math/MathML'>
<msup><mrow/> <mo>∘</mo> </msup>
</math>
</formula>.
</p>
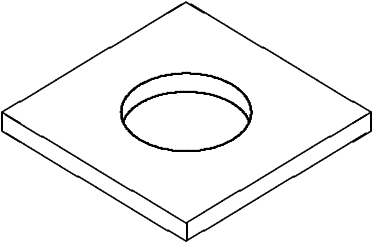
Last example, showing arcs and circles.
\setlength{\unitlength}{1.8mm}
\begin{picture}(40,30)
  \thicklines
  \multiput(20,5)(20,12){2} {\line(0,-1){2}\line(-5,3){20}}
  \multiput(20,5)(-20,12){2} {\line(5,3){20}}
  \put(20,3){\line(5,3){20}}
  \put(20,3){\line(-5,3){20}}
  \put(0,15){\line(0,1){2}}
  \linethickness{1pt}
  \put(20,5) {
   \renewcommand{\xscale}{1}
   \renewcommand{\xscaley}{-1}
   \renewcommand{\yscale}{0.6}
   \renewcommand{\yscalex}{0.6}
   \scaleput(10,10){\bigcircle{10}}
   \put(0,-2){%
      \scaleput(10,10){\arc(5,0){121}}
      \scaleput(10,10){\arc(5,0){-31}}}}
\end{picture}
<picture width='204.85962' height='153.64471'>
  <pic-thicklines/>
  <pic-multiput xpos='102.42981' ypos='25.60745' repeat='2' dx='102.42981' dy='61.45789'>
    <pic-line xdir='0' ydir='-1' width='10.24298'/>
    <pic-line xdir='-5' ydir='3' width='102.42981'/>
  </pic-multiput>
  <pic-multiput xpos='102.42981' ypos='25.60745' repeat='2' dx='-102.42981' dy='61.45789'>
    <pic-line xdir='5' ydir='3' width='102.42981'/>
  </pic-multiput>
  <pic-put xpos='102.42981' ypos='15.36447'>
    <pic-line xdir='5' ydir='3' width='102.42981'/>
  </pic-put>
  <pic-put xpos='102.42981' ypos='15.36447'>
    <pic-line xdir='-5' ydir='3' width='102.42981'/>
  </pic-put>
  <pic-put xpos='0' ypos='76.82236'>
    <pic-line xdir='0' ydir='1' width='10.24298'/>
  </pic-put>
  <pic-linethickness size='1pt'/>
  <pic-put xpos='102.42981' ypos='25.60745'>
    <pic-scaleput xpos='51.2149' ypos='51.2149' xscale='1' yscale='0.6' xscaley='-1' yscalex='0.6'>
      <pic-bigcircle size='10' unit-length='5.12149'></pic-bigcircle>
    </pic-scaleput>
    <pic-put xpos='0' ypos='-10.24298'>
      <pic-scaleput xpos='51.2149' ypos='51.2149' xscale='1' yscale='0.6' xscaley='-1' yscalex='0.6'>
        <pic-arc angle='121' xpos='25.60745' ypos='0' unit-length='5.12149'>
        </pic-arc>
      </pic-scaleput>
      <pic-scaleput xpos='51.2149' ypos='51.2149' xscale='1' yscale='0.6' xscaley='-1' yscalex='0.6'>
        <pic-arc angle='-31' xpos='25.60745' ypos='0' unit-length='5.12149'>
        </pic-arc>
      </pic-scaleput>
    </pic-put>
  </pic-put>
</picture>
\arccos (math symbol)
The \arccos command is valid only in math mode. Its translation is a
math operator of the same name: <mo form='prefix'>arccos</mo>. For
an example see the `\log <doc-l.html#cmd-log>`__ command.
\arcsin (math symbol)
The \arcsin command is valid only in math mode. Its translation is a
math operator of the same name: <mo form='prefix'>arcsin</mo>. For
an example see the `\log <doc-l.html#cmd-log>`__ command.
\arctan (math symbol)
The \arctan command is valid only in math mode. Its translation is a
math operator of the same name: <mo form='prefix'>arctan</mo>. For
an example see the `\log <doc-l.html#cmd-log>`__ command.
\arg (math symbol)
The \arg command is valid only in math mode. Its translation is a
math operator of the same name: <mo form='prefix'>arg</mo>. For an
example see the `\log <doc-l.html#cmd-log>`__ command.
array (environment)
The array environment can be used only in math mode. Its first
argument is a list of column specifications, where each specification is
a letter, one of r, l, rc (for right justified, left
justified, centered). It is followed by rows (separated by \\) and
each row is a list of cells (separated by &). The eqnarray
environment is implemented like an array, with rcl as
specifications. In the example that follows, the outer array has only
one row, and one column. The syntax of array is the same as that of
tabular, but you cannot use \hline for horizontal rules, and
neither | specifications for vertical rules. You may use
\multicolumn.
\def\R{\mathbf{R}}
\begin{eqnarray*}
\left\{\begin{array}{lcl}
\dot{x} & = & Ax+g(x,u)\\
 y & = & Cx \\
 \multicolumn{3}{l}{x\in \R^n}
\end{array}
    \right.
\end{eqnarray*}
Translation
<formula type='display'>
<math xmlns='http://www.w3.org/1998/Math/MathML'>
<mtable>
<mtr>
<mtd columnalign='right'>
<mfenced open='{' close='.'>
<mtable>
<mtr>
<mtd columnalign='left'>
<mover accent='true'><mi>x</mi> <mo>˙</mo></mover>
</mtd>
<mtd><mo>=</mo></mtd>
<mtd columnalign='left'>
<mrow><mi>A</mi><mi>x</mi><mo>+</mo><mi>g</mi><mo>(</mo><mi>x</mi>
<mo>,</mo><mi>u</mi><mo>)</mo></mrow>
</mtd>
</mtr>
<mtr>
<mtd columnalign='left'><mi>y</mi></mtd>
<mtd><mo>=</mo></mtd>
<mtd columnalign='left'><mrow><mi>C</mi><mi>x</mi></mrow></mtd>
</mtr>
<mtr>
<mtd columnalign='left' columnspan='3'>
<mrow><mi>x</mi><mo>∈</mo><msup><mi mathvariant='bold'>R</mi>
<mi>n</mi> </msup></mrow>
</mtd>
</mtr>
</mtable>
</mfenced>
</mtd>
</mtr>
</mtable>
</math>
</formula>
We give here two versions, the old one and the new one; in January 2005,
we modified the xmt file, the result is much better. 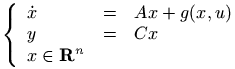
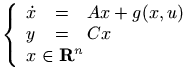 (see also here).
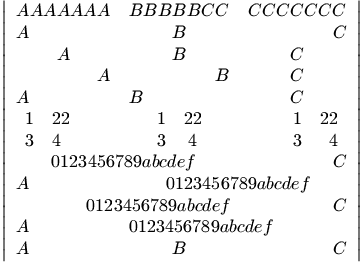
We give here another example. It shows that you can put tables into tables.
\def\MAT#1{\begin{array}{c#1}1&22\\3&4\end{array}}

\[\left|
\begin{array}{lcr}
AAAAAAA&BBBBBCC&CCCCCCC\\
A&B&C\\
\multicolumn{1}{c}{A}&\multicolumn{1}{c}{B}&\multicolumn{1}{c}{C}\\
\multicolumn{1}{r}{A}&\multicolumn{1}{r}{B}&\multicolumn{r}{c}{C}\\
\multicolumn{1}{l}{A}&\multicolumn{1}{l}{B}&\multicolumn{l}{c}{C}\\
\MAT l&\MAT c&\MAT r\\
\multicolumn{2}{c}{0123456789abcdef}&C\\
A&\multicolumn{2}{c}{0123456789abcdef}\\
\multicolumn{2}{r}{0123456789abcdef}&C\\
A&\multicolumn{2}{l}{0123456789abcdef}\\
A&B&C\\
\end{array}
\right|\]
\arraycolsep (rigid length)
This is half the width of the default horizontal space between columns
in an array environment. It is defined in the LaTeX book class to be
5pt, so that the horizontal space is one em in a 10pt document
normal size, and much smaller (in em units) for a 12pt huge size.
What Tralics should do is to add an attribute pair
columnspacing='xx' to each <mtable>. The default value is 0.8em
(this depends on the font size….)
\arrayrulewidth (rigid length)
Width of a vertical rule in array or tabular; not yet used by Tralics.
\arraystretch
This command controls the spacing between rows in a table or an array.
The algorithm is the following: there is an object, \strutbox,
containing an invisible rule, whose height is 70% of \baselineskip
and whose depth is 30% of \baselineskip (this object depends on the
current font). (if \baselineskip is 12pt, this gives 8.4pt, PlainTeX
defines that height to be 8.5pt).
There is another object (array-strut) constructed at the start of the
array, with the same dimensions, multiplied by \arraystretch. A copy
of this object is added to the start of every row. This implies that the
baselines of two columns are separated by 12pt (for a ten point font,
\arraystretch=1) or by 13.2pt (if \arraystretch=1.1). An
expression of the the form A_1^2 has height 8.14, depth 2.48 (total
10.622) so that the vertical space between two such rows is 1.4pt by
default (TeX puts a kern of value 1.6pt between the subscript and the
superscript).
In MathML there is an attribute rowspacing that indicates the space
between rows. The default value is 1ex (this is 4.31 pt in cmr10). This
does not match the LaTeX definition.
In short: Tralics sets \arratstretch to 1, and ignores what the
user does with the command.
\Arrowvert (Math symbol)
The \Arrowvert command is an alias for
`\Vert <doc-v.html#cmd-Vert>`__.
\arrowvert (Math symbol)
The \arrowvert command is an alias for
`\vert <doc-v.html#cmd-vert>`__.
\ast (math symbol)
The \ast command is valid only in math mode. It generates a binary
operator (looks like a *): <mo>*</mo> (Unicode U+2A, *)
that renders like  . See description of the
`\pm <doc-p.html#cmd-pm>`__ command.
\asymp (math symbol)
The \asymp command is valid only in math mode. It generates a
relation symbol that looks like the superposition of \smile and
\frown: <mo>≈</mo> (Unicode U+224D, ≍) that renders like
 . See description of the
`\le <doc-l.html#cmd-le>`__
command.
\AtBeginDocument
The \AtBeginDocument command takes one argument, that is a list of
tokens, which is added to the end of the document-hook token list. This
list is inserted into the document when \begin{document} is
executed. See description of the
`document <doc-d.html#env-document>`__ environment.
This example shows the use of \AtBeginDocument and
\AtEndDocument including a call to itself. In the example, the
bibliography is put at the end, after the tokens inserted by
\AtEndDocument. In the current version, the position of the
bibliography is defined by the position of the commands
\insertbibliohere or \bibliography.
\AtBeginDocument{DOC}\AtBeginDocument{S\AtBeginDocument{TART}}
\AtEndDocument{\AtEndDocument{AT\_}}
\AtEndDocument{DOC}\AtEndDocument{\_END}
The resulting XML file looks like
<?xml version='1.0' encoding='iso-8859-1'?>
<!DOCTYPE ramain SYSTEM 'raweb.dtd'>
<!-- translated from latex by tralics 2.0-->
<ramain CALC='true' creator='Tralics version2.0'>
<p>DOCSTART</p>
...
...
<p>AT_DOC_END</p></div3></div2></div1></div0>
<biblio>
...
</biblio></ramain>
\AtEndDocument
The \AtEndDocument command takes one argument, that is a list of
tokens, which is added to the end of the document-hook token list. The
effect of the \end{document} command is to insert these tokens into
the main token list. At the same moment, \AtEndDocument is made
equivalent to \@firstofone (meaning: execute now). See
`\AtBeginDocument <doc-a.html#cmd-atbegindocument>`__.
\AtEndOfClass, \AtEndOfPackage
The two commands behave the same: they read an argument, and push it to the current class/package hook. This hook will be inserted when the end-of-file (corresponding to the class or package) is reached. When the command is used out of context, the hook is never inserted.
\atop
The \atop command is a TeX primitive that should not be used.
Instead of `aa \atop bb’ you should use
`\genfrac{}{}{0pt}{}{aa}{bb}’. See
`\genfrac <doc-g.html#cmd-genfrac>`__ and
`\over <doc-o.html#cmd-over>`__.
\atopwithdelims
The \atopwithdelims command is a TeX primitive that should not be
used. Instead of `aa \atopwithdelims()bb’ you should use
`\genfrac(){0pt}{}{aa}{bb}’. See
`\genfrac <doc-g.html#cmd-genfrac>`__ and
`\over <doc-o.html#cmd-over>`__. Plain TeX defines
\def\choose{\atopwithdelims()}, and you can say a\choose b. In
Tralics, you would use \binom ab.